Thursday, October 1, 2009

How to... speed up your RF simulations

.

Handling a complex scene in a few seconds per frame, using the command line

Many factors are decisive when you try to improve the performance of a Realflow simulation. Small simulations can be processed in a few minutes but large scale simulations (like massive fluids, natural disasters, seas, etc) may take many hours, and even days, although we´re using high end workstations. Of course, depending on the complexity of the scene, with special attention to the collision objects (never use final geometry, be sure to use simplified low-poly proxies), and resolution of the fluids, and many other parametres like viscosity or surface tension may affect seriously the time of the whole process.

One of the most important factors is the 'MAX Substeps' parameter: to decrease the 'MAX Substeps' can help us to make really faster simulations. By default, the 'MAX Substeps' is set to 333, however we rarely will need this level of accuracy, so we can reduce this value drasticly. Usual and simple simulations (pouring fluids on a vase, waterdrops, etc) may demand some values between 80 and 60, or even less in many cases. You can test your own values, but remember that extremely low values may affect and distort your fluid behavior, and your scene will become unstable: our aim is to seek a value in an equilibrium point between stability and and fast-performance. To change the 'MAX Substeps' value, simply go at the bottom-right corner and access the down arrow (sub-menu) located at the Simulate button > Options:


Now you can change the 'MAX Substeps' to the desired value:


Bear in mind you also can change this value in File > Prefrences > Simulation.

While we´re running a simulation, we can press Alt D to disable the viewer. Realflow keeps calculating the simulation, even though we can not seet it. To bring back the image on the preview, we just simply press Alt D, again.

Disabled viewer

Using the command line is the fastest way to calculate simulations in Realflow, by far. This method allows the computer to manage strictly the calculation process without launching the graphic user interface (GUI), calculate previews, etc. Definately is the best way to run complex simulations. The workflow is to launch the GUI program as usual to prepare the scene, set the fluids and objects parametres, daemons, contrtaints if needed, etc. and finally save the scene (*.flw file) we will use later. Once the scene is saved and Ralflow closed, this is the way to launch your command line simulation, following these easy steps:

WINDOWS:

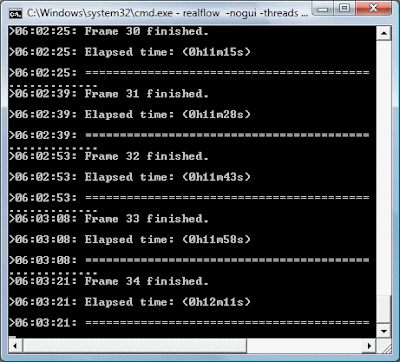
1.º Go to Windows logo at the bottom-left corner (Start in XP), and type cmd in the search field. ('Run' option, in Windows XP). A command prompt window will pop up:


2.º Go to the folder where realflow.exe is installed; for instance, introduce (in my case):

cd\Program files (x86)\Next Limit\x64\realflow4\

...or drag and drop the folder directly on to the prompt window (in Windows XP). Something similar to this must appear:


3.º Now type the following command (where the # symbol is the number of available threads in you computer and the .flw is the path to the .flw file you recently saved):

realflow -nogui -threads # c:\your_path\test01.flw

in my case is c:\Users\Victor\Documents\RealFlow\test01\test01.flw


Then we hit enter, and the simulation will start immediately on command line mode: all active nodes will be calculated. Please note in this example we´re calculating all the process and active nodes in the scene, but there are many flags to calculate determinate actions, for instance: only build meshes, only a range of frames, etc. You the command list in the Realflow Help > Contents > RF4 > Command Line > Win, Linux, Mac...

MAC OS X

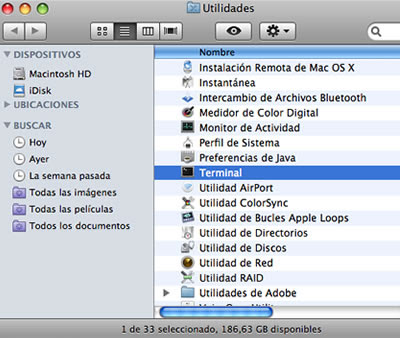
1.º Open a Terminal shell. Terminal is located under /Applications/Utilities/ folder.

2.º With active terminal, press Command key while clic over the Realflow application in the Dock, then Mac OS will expand a new window with the located Realflow Package. We simply navigate into the Realflow Package and locate the file: Contents/Mac Os/realflow. We select the file 'realflow' and drag and drop it on to the Terminal shell, and then we add the desired flags, for example: -nogui (to run the application without user interface), -threads # (where # is the numer of maximum threads in our machine), -mesh, -frames, etc.
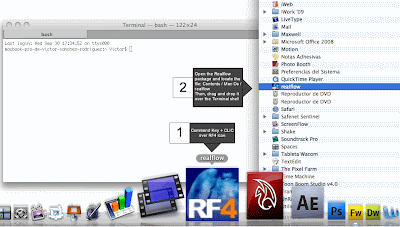
Clic on the image above to enlarge

3.º Then, we finally locate the .flw file to simulate and drag and drop it to the Terminal shell, so we´ll have something like this:


/[path_to_rf_application_folder/Contents/MacOs]/realflow -nogui -threads # [path_to_flw_file_folder]/name_of_file.flw

Remember: # is the number of available threads in our computer. In my case the whole command is:

/Applications/realflow.app/Contents/MacOS/realflow -nogui -threads 4 /Users/Victor/Documents/RF/test01/test01.flw

Then hit enter, and enjoy!. As mentioned before, at the end of Windows section, bear in mind we have a lot of different commands to simulate determinate actions (meshes, frames ranges, etc).

P.D.: Thanks to Next Limit Team for his patience, help and support.

Wednesday, September 16, 2009

Pancakes with RF syrup

I´ve been researching about a honey-like fluid over the past 2 weeks, and this is what I got, finally. Getting high levels of viscosity can be a tricky task due to complex calculations with extremely huge values in parametres like viscosity, density, sticky, etc., then the computing proccess usually becomes unestable or even may crash. However after many tests, and a long tweaking procces I could achieve this kind of fluid similar to honey (a little bit more liquid, maybe). Hope you like it, and don´t forget to post your own personal critics and comments. Thank you in advance.

Pictures from the work in progress (clic to enlarge):


Testing the shaders in a close-up


Trying a SSS configuration for the milkshake (that I finally didn´t use)

Friday, July 31, 2009

Next Limit Rocket (The 'Impulse' feature in RF4)

This is a very recursive but fun exercise to practice the 'Impulse' feature in Real Flow. I have not used it for many times but it´s really effective and you can get good results, and even with physically correct based results. Basicaly it´s just an emitter (in this case a circle) parented to an objetct (the rocket, at the bottom) that causes an impulse like in the real world. This is not the final render, but I find it really funny, specially because of the 'scale model' set.

Monday, June 1, 2009

And now... Rigging!


Once again, I´m taking an advanced rigging course at Oscillon School, this time about rigging and character setup. We began with a few small and easy examples, as usual, but a few weeks later we began to build our own bones groups, appling inverse kinematics propierties, etc. Take a look at this one.

Sunday, May 31, 2009

Bullet in slow motion (Realflow egg)

I made this video specially focused on the depth of field with fluids. As I needed a liquid that slowly comes to the camera POV, I immediately took the references of the slow-motion filmations (usually with scientific pursposes) when a bullet is crossing an objet (apples, bottles, cups of milk...), so finally I took the main reference from here. Although the Realflow mesh it´s improvable (specially within the area of the egg white, and its particular fillaments), and the shaders too (yolk shader without SSS, plain color on the shell, etc...) I´m quite happy with the final result.

The egg shards explotion is simulated using the Maya Dynamics. Realflow for the fluids, and Maxwell Render for the final render. I used Adobe AfterEffects for the final composition (Color correction, Time remaping, etc.).

UPDATE: This video has been selected for NextLimit for the Maxwell 2.0 Reel THANK YOU, GUYS! Link here (at the very end of the video):
http://www.maxwellrender.com/mw2_product.php

Saturday, May 30, 2009

The 'Realflow Bloodflush' video reaches 10.000 views in YouTube

I think this is the first time that one of my videos reaches more than 10.000 views in YouTube. Almost 10 mounths after posting it, it looks like the 'Realflow Bloodflush' video gets an average of 1.000 per mounth (wich is not bad for a 'fluid simulation' video). I made this video with the only purpose of learn the basic tools in RF4, explore the wetmaps feature and have some fun, as well.

I´m very happy if you like stuff like this, and I hope to post a new
relevant video very sooon... but at this moment I just can say for ten thousand times at the YouTube users: THANK YOU!

Friday, April 3, 2009

How to... Batch render in Maya 2009 with Maxwell Render

Both in Win x64 and Mac OS X, if you want to render an image sequence for an animation using Maxwell, probably you´ll note when you press the 'Batch render' button, Maya begins the task showing the following message in the script editor: "Rendering wiht Maxwell render..." and look likes everything is going to run OK... however, when you take a look a the final result you´ll realize Maya has automatically changed the render engine from Maxwell to 'Maya Software' and the output images aren´t actually rendered via Maxwell as you want. It´s a known bug, and it´s still not working with the last plug in version 1.7.11.

To solve this, you can automatize the Maxwell Render task by exporting the .mxs sequence of your scene (1 .mxs per frame), and then batch process directly inside the Maxwell Render standalone application.

First step is set the Maya parameters as usual for an animation: File name prefix, Image format, name.#.ext for your outputfiles, and be sure to set the Frame padding to 4. It´s extremely important you pay attention to this setting or else Maxwell Render will not recognize your files in the batch rendering process later:


Set up your Maxwell settings as you want and select a minimum Sample Level (SL) or time (in minutes) that will be used by Maxwell to achieve the aim for each frame: when Maxwell achieves the the faster option (desired sample level or desired time) it will automatically close/save the render and will begin the render of the next frame:


Go to File > Export all Objects and select File type: Maxwell Scene and be sure to check Animation option. Then press Export All and select where do you want to save all the .mxs files: remeber one .mxs per frame will be saved, maybe a huge amount of data, depending on your scene:


Next step: Open Maxwell Render (standalone aplication) and go to File > Open MXS then select the first .mxs file recently exported in your sequence:


Go to Render Options tab and select the folder where you want to save the .mxi files and output images. Finally, set the your animation frames range (in this example, from 1 to 100):


Finally hit render, and... that´s it!: your batch render process will start immediatelly and you´ll have not to warry about render frame by frame your Maya sequence using Maxwell Render.

Note: I´ve been testing a few times this method, and it uses to works fine, but if you try to apply 'shake movement' to the camera via expressions, unfortunately the .mxs conversion process will not recognize the code and the camera will not achieve the desired effect.

Tuesday, March 3, 2009

Twitter Feed


I´ve linked this blog to my twitter account via twitterfeed (a free, simple and easy-to-use tool for feed blogs to twitter: official site) So, if you´re a twitter user, note you can follow me via twiteer too (the blog feeds twitter automatically).

As usual, comments and feedbacks will be highly apreciated. Thank you!

Tuesday, February 3, 2009

Take a walk on the wild... 'cycle'

The Oscillon School Course is now at its final part, exclusively dedicated to animation principles, deformation, squash & strecth, acting & poses, curves, overlapping, etc. As usual, we began working on easy simple excersises. Later on, we were instructed to build the classic animation cycle: Take a look at the nice results with Maxwell Render (mid-part)!

You can check for this video here. I have to say that the caracter was already rigged using classic controls for FK and IK tools, so we only paid atention at the animation process itself. I will continue explore a few movements or actions in next future (work in progress).

Saturday, January 3, 2009

3D Character Turnaround

My final project for the Maya Course at Oscillon School becomes real! This is my first organic model, and I´m quite happy with the result. I´ve texturized it in 2 different versions: Maya Materials (specifically designed for Mental Ray) and Maxwell Materials. I´m afraid we can´t check the high detail that I used for textures (like the clothes, leather, glass) because of the video compression, however I hope you like the video as I enjoy all the creation process. Be sure to watch it in HD quality! (only at Vimeo).

P.D.: Character design inspired on the StormHakws series, © Nerd Corps Entertainment